When you decide to transform your room into a home recording studio, first you need a plan to set it up. It should look like a real recording studio. Not a regular room.
You have to choose the best room for recording, set up your working area, and a place for players, instruments, etc. You have to arrange your room to make it a great place for music recording.
And in this guide, you will learn how to set up your room for recording from start to finish. Your room may not meet all the requirements that are in this section, but it should have some of them.
How To Build Home Recording Studios
This home recording studio setup guide covers all the major things. You will find information about room size, acoustic treatment, essential studio gear, and more.
1. Choose The Right Recording Room
The first and most important thing when you are building a home recording studio is to choose the best room you can. At your home, you may have different numbers of rooms and you have to pick the right one.
It may be your bedroom, living room, some kind of storage room, attic, or even a garage. But there are several things that this room should have.
If the room you pick is not good for recording, you won’t be able to create a great space for recording. You will have several recording-related issues.
Let’s start with the room and see what will be the best room for home recording.
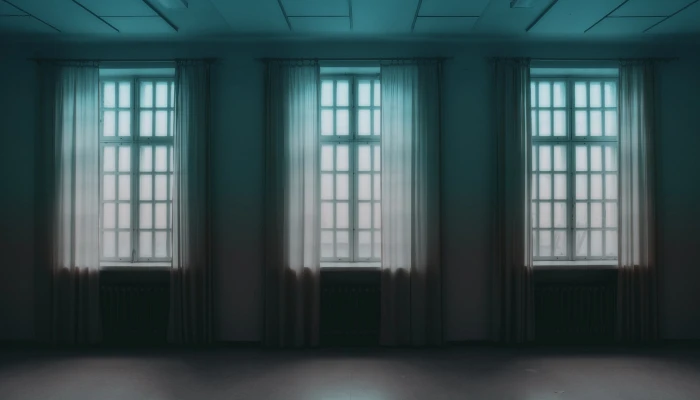
Room Shape
The first thing you should consider when choosing a room for a recording studio is the shape. The best room shape for recording is a rectangular shape. Try to avoid square, circular, or irregular shape rooms.
With a rectangular room, we have more control. The sound will be better and you will create better mixes. Sound waves will have more space to travel and you may avoid many bouncing frequencies from the wall.
The length of the recording room should be longer than the width. But it doesn’t take too long. The difference between length and width could be 3.2 or 6.5 feet.
So, if you have a rectangular room in your home, it will be the first choice. But if your house doesn’t have one, then the next best choice will be a room in the shape of a square.
Room Size
Room size is also very important for a home recording studio. Most of our homes have small rooms. So, a twenty-three to thirty-two square feet room would be enough to start a recording studio. More is better but a room with at least 10 feet in width and 13 feet in length would be a good start.
More space means that you will get a better sound and also have a space to place different instruments, separate space for musicians, furniture, etc.
But most of us don’t have big rooms. Especially if you live in an apartment. So, if you have at least a twenty-three square feet, rectangular room, that should be your recording studio.
Room Height
Also, what you should consider when choosing the room for recording is the height. Maybe it’s not as important as shape and size, but good room height can be a great helper.
Most of the homes have about ten-foot-high rooms. And that’s pretty enough. Professional recording studios have more ceiling height but we try to build a recording studio at our home. Also, a very high ceiling could be bad. They may cause sound reverberation.
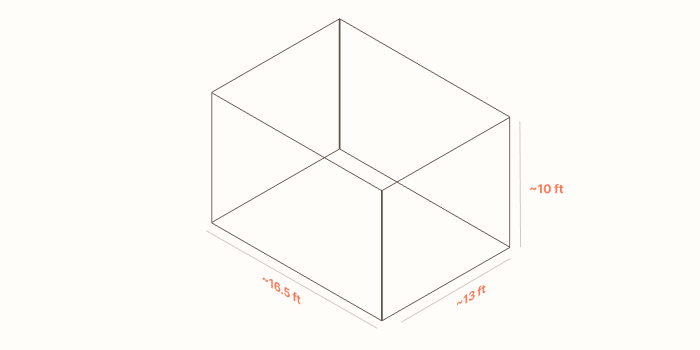
So, a room about ten feet in height is a great place to set up your recording space. The sound will have enough room to travel.
Floor And Walls
For a recording studio, a hard floor is the best. Tiles, hardwood, or concrete are great. And don’t use carpets. They tend to absorb high frequencies and you will have several issues. If you have a carpet on your floor, take it out. It may look cool, but you don’t need it.
On the other hand, you don’t want to have very hard walls. They will bounce the sound and you will have an echo. Of course, you can make your room sound better by adding sound treatment, but the room shouldn’t have very hard concrete walls.
However, as long as we try to build a recording studio at our home if your room doesn’t have perfect walls or floors for recording purposes, that’s not a big problem. People create great mixes in the worst environments.
But most of the rooms have pretty hard floors and gypsum board walls. And that’s very good for recording. When you add sound treatment, it will be the perfect room for home recording.
Room Noise
Your recording room should be as noiseless as it can be. Noise will interfere with your recordings and you will have many issues and you won’t be able to fix them. Avoid rooms that are next to the road, construction site, etc.
The best room will be the middle room when it has other rooms on the sides. Or a room with one side in the backyard. It should be a quiet room without any noise coming outside.
If you live in the countryside or suburbs, you will have no noise problem. But if you have an apartment on a busy street, you have to do something to stop the noise.
You will need windows that stop the noise. Fortunately today it’s not very expensive to install windows that don’t let the noise pass.
Furniture
Although the recording studio should be as empty as possible, you may place some furniture too. It also may be great for sound. But try to place soft furniture and avoid hard ones.
For example, you may have a soft couch or a bed if you use your bedroom as your home recording studio. But you should not place a bedroom there.
Also, a bookshelf could be a great addition to your studio. Some irregular surfaces can be beneficial to the sound. Place books on the shelves and they will absorb some sound waves and you will avoid bouncing sounds.
You can hang shelves on the sidewalls or the back wall, facing your workstation. If you have a couch, also place it on the opposite wall from your workstation.
So, you can add some furniture to your room but it should be minimal and soft. Don’t overload your recording room with too much furniture.
2. Add Acoustic Treatment
The next step in the recording studio setup is sound treatment. It’s very important and it will make your room sound like a real recording studio.
These sound treatment panels absorb different frequencies and reduce echoing and bouncing sound waves. If you don’t install them, you won’t be able to mix songs in there.
There are different types of sound treatment materials. Also, they come in different shapes. All of them work great with sound. But you have to avoid very cheap ones. Not only do they do almost nothing, but they might also ruin the whole thing for you. Buy a decent sound panel for your home recording studio.
There are several types of acoustic treatment panels. So, you need to know what they do to properly treat your room. If you do it incorrectly, you will worsen the sound of your room.
There are four main types of acoustic treatments you should know about:
- Bass traps
- Acoustic panels
- Diffuser panels
- Ceiling panels
Bass traps are one of the most important for sound treatment. They are specifically for low frequencies and are thicker than acoustic panels. And because the low frequency is the most problematic, you must have a bass trap.
Bass or low frequency tend to gather in corners and without good treatment, you will have many unwanted issues. So, typically people place bass traps in corners. And it’s better to place them in every corner a room has.
Absorbing acoustic panels are for walls, they are thinner than bass traps and they don’t absorb low frequencies as well as bass traps. Wall panels are for mid and high frequencies. You should have them on every wall. Also, if you have a frum in your room, definitely place a panel behind it.
Different from acoustic panels, diffuser panels do not fully absorb the sound. They bounce some of the waves back. This helps to create a more natural environment.
So, the best option is to use a combination of acoustic and diffuser panels to create a more natural recording environment. You don’t want to have a dead room. You need some bouncing sound waves too.
And lastly, there are panels for the ceiling. You can use regular wall acoustic panels or there are specific panels for the ceiling. You just hang them on the ceiling and you won’t have bouncing waves from the ceiling.
Learn more about home recording studio acoustic treatment.
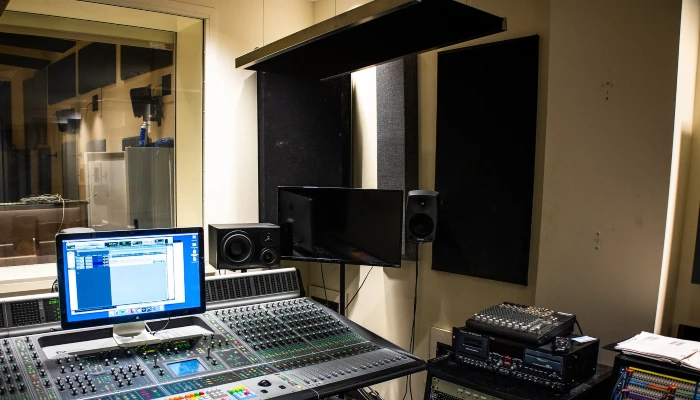
3. Build Your Workstation
You need to build a workstation in your studio. A place where you work and manage everything. Most of the time you will be in this place. So, it must be comfortable.
Choosing the best place for your working area is very important. The place must be great to hear everything correctly to make great records.
So, you need to choose what type of workstation you need, where to place it, and how to arrange your desk to get the best results.
Type Of Workstation
There are lots of great studio workstations available. They make the working process easier and more comfortable. But not everybody needs a professional recording workstation.
You can use a simple desk or table and make some changes to it. Or if you can, build one yourself. Many people build their recording desks these days.
Studio furniture comes in different sizes, shapes, and prices. Depending on your space, you may need to have a small desk. But if your studio has enough space for a bigger desk, it’s better.
Studio desks are great because they are made for studios specifically. They have areas where you put high-end studio monitors, places to install racks, slide drawers for MIDI keyboards, etc.
For a home recording studio, a $200-$400 studio desk is pretty enough. But if you don’t want to spend money on a workstation, you can use any table you have at your home.
Just make sure that it has enough length and width. You have to manage to place a PC, studio monitors, audio interface for recording, keyboards, and other gear on it.
Workstation Placement
More important is where you place your studio desk. This will be your working area. So, it must be comfortable and the best-sounding place.
Don’t place it in the center of your room. The best place for the workstation is against the wall. But make sure that there is some gap between the wall and the desk. A gap between 3.9″ and 7.8″ is enough.
The reason you need a gap between the desk and the wall is studio monitors. If a studio monitor is too close to the wall, it will cause problems. So, make sure there is some gap.
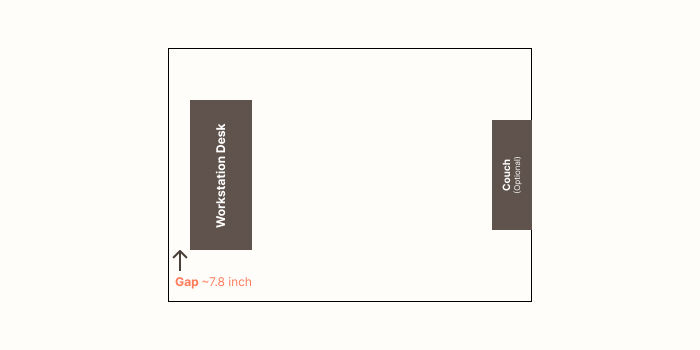
And the best wall to place your workstation is one of the shorter walls. If your room is ten feet by thirteen feet, place your studio desk against one of the ten-foot walls.
This way sound coming out of your studio monitors will have more space to travel and you will avoid bouncing sound waves. So, you need more space behind you than on your sides.
Always place a working desk near the shorter wall in your home recording room.
Workstation Arrangement
Finally, you need to arrange your workstation and place all the necessary gear on your desk. Depending on the gear you own, you may arrange it differently. But there is some essential gear you should have on your home recording studio desk.
First, you need to place a laptop or PC in the center, near the edge of your desk. Mouse on the right and keyboards on the front of your monitor. The monitor should be on the level of your head. So, put it on something high.
On the left side, you should place the audio interface and connect it to your PC. Some studio desks have shelf-like areas and you can place an audio interface there.
Studio monitor placement is very important. Put one studio monitor on the right side and another on the left side. A little behind your PC.
Studio monitors should be on some kind of pedestal. Your face and studio monitors should be on the same level, as the case of a PC monitor. Workstations have specific areas for studio monitors but if you are using a table, you can put books or something similar to put monitors on top.
The goal is that when you are sitting on your chair, your ears and studio monitor speakers must be at the same level.
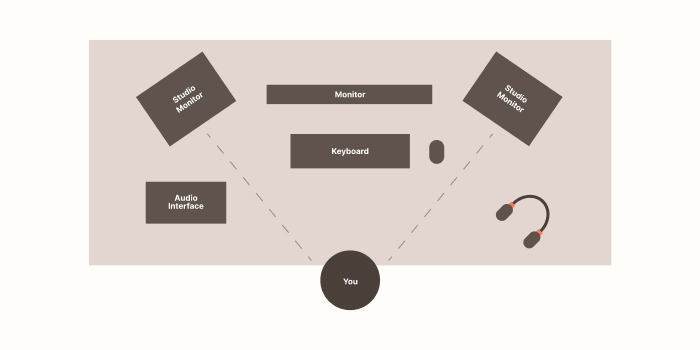
Also, monitors should face you. Make sure that they are perpendicular to the wall. There is no exact degree to which you should tilt them. The best practice is when the speaker is aiming your ears. This way you will get the best possible sound from the speakers.
Don’t place anything Extra on the desk. Only the necessary gear. You can place MIDI keyboards on the slider drawer, or just buy a keyboard stand and place it on your right or left.
If you own any outboard gear such as EQ or compressor, you can build or buy a rack and place it on your right or left. Some workstations come with rack mounts and you can use them.
Now you will have everything placed near you and you manage your work easily.
4. Leave Space For Musicians
A great feature of the home recording studio is that it has a separate space for musicians. Of course, not everyone has enough room for that but you can still manage to do it.
You can arrange a musician’s space in the corner or any free space. And it doesn’t need to be big. You need a place to place a microphone for singers and a chair for players. But if you have a couch, players can sit there.
Vocal Booth
You may not have a place for guitarists but you need to find some area to place a little vocal booth there. And the vocal booth in home studios is nothing special. Just a mic stand with a special filter to avoid any interference with vocals.
Because the microphone can pick up different sounds, it should be as isolated as possible. If you have any extra room or some kind of storeroom, you can use it as a vocal booth.
But if you don’t, an isolation filter on a mic stand will be a great alternative. The goal is to make the vocal area as isolated as possible.
Players
Players don’t need any isolation as long as you record instruments with audio interfaces. They can sit on a couch or chair and record their instruments.
But if you record guitars and basses with an amp and microphone, then you need to have some kind of isolation. In general, your recording room should be quiet and free from outside noise.
Additionally what you can do is build a cabin for an amp. These are square boxes built with wood panels and you install some soft material inside. This type of amp cabin is really popular among home recording studio owners. It isolates amps and you get a clean sound.
But for a home recording studio, sometimes it’s better to use guitar amp sims. There are tons of realistic-sounding plugins for guitars and basses. And you can find countless free or premium amp sims. You will have a great sound and avoid any interfering noise.
5. Instruments And Accessories
When you have a home recording studio, you likely have some instruments too. You may have a guitar, bass, or even drums. So, you need to find a place to put them.
Sometimes it’s hard to find a free area for instruments. Especially in small recording rooms but you can manage it.
If you are interested in building a home recording studio, check out my home studio builds in different price ranges.
Drums
I would recommend acoustic drums for bigger recording studios because they take up a lot of space and you won’t be able to get a good sound in a small space.
For small studios, I would suggest an electronic drum set or you can go fully digital and use VST drums. They are cheaper and more convenient, and modern drum plugins produce good sound.
But if you have an acoustic or electronic drum set, then a corner is a great place to put it. You can place it in the corner, opposite the wall from your workstation.
This way it will occupy less space. But you need to have a great acoustic treatment behind it.
Guitars And Basses
Guitar and bass are easier to manage. They are small and occupy less space. You can buy a guitar stand that holds a couple of instruments and place it beside the wall.
Alternatively, you can hang them on the wall. But you have to consider acoustic panels. When you have a panel on the wall, maybe there is no place for instruments. You can hang them on the wall above your workstation.
Keyboards
As mentioned above, you can place keyboards in different places. If your desk has a special place for MIDI keyboards, you can put them there.
You can buy a keyboard stand and put it on your right or left. Also, you can put it near the walls. Depending on your workstation and room size, there are numerous places where you can put your MIDI keyboards or electric pianos.
Microphones And Cables
Microphones, cables, and other accessories are easier to manage. You can hang them on the wall if you have space or use drawers.
Your desk might have one or two drawers. Or you can buy small furniture with drawers and place them there. But hanging accessories on the wall perhaps is the best option.
Conclusion
Building a home recording studio can be challenging but it’s not as hard as it seems. We can transform any room into a recording studio easily. Some rooms work better as studios than others but we have to use what we have.
First, you must choose the best room for recording, a rectangular shape is better. Block if there is any noise, add acoustic treatment, and set it up. Place your workstation, arrange it, leave space for instruments, and singers, add some furniture and you are ready to start recording and mixing music at your home studio.
I’m impressed, I have to admit. Rarely do I encounter a blog that’s equally educative and amusing, and let me tell you, you have hit the nail on the head. The problem is something which not enough folks are speaking intelligently about. I’m very happy I stumbled across this in my search for something regarding this.
Thanks a lot.