A good room and equipment are essential for recording. But if you don’t have good acoustic treatment in your home studio, it won’t sound good.
Sound treatment transforms a simple room into a professional-sounding recording room.
But to properly do it, you need to know what it is, how it works, and how to treat your room acoustically to achieve the best results.
What Is Acoustic Treatment?
Room acoustic treatment is a process that transforms a bad-sounding room into a professional recording environment. This is done by hanging acoustic panels on walls and other specific areas of your room.
Sound travels in your room and hard surfaces like walls, ceiling, or floor reflect and bounce it. And that is a bad case in the recording room.
You have to minimize any bouncing sound waves or echoes in your room. But also you don’t need a room with a dead sound.
That’s why you need specific acoustic panels that absorb sound and reduce bouncing waves and echo in a room.
But to do it correctly you need to understand different types of panels, how they work, and how to properly place them in a home recording room.
What Type Of Acoustic Panels Exist
Acoustic panels are made from different materials such as foam or fiberglass. But more important is the type of acoustic panel.
In general, they absorb the sound to make the room more recording-friendly.
And what you need to know about sound treatment is the type of acoustic panels. Because there are panels for different sound frequencies. Some are for lows, and some are made for mid and high frequencies.
It’s critical to know which one uses and how to place them properly to create a great acoustic and recording environment.
Bass Traps
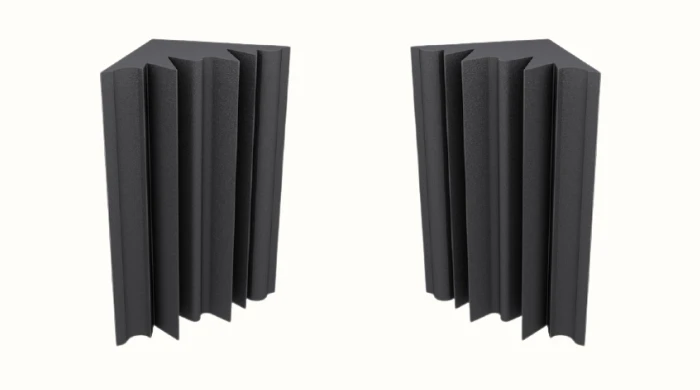
The first acoustic treatment type you should know is a bass trap. It’s designed to absorb low frequency.
It is critical for recording studios because low frequency tends to build up in a room which ruins everything. Without bass traps, there will be no good sound in your room.
Bass traps are placed in room corners because low-frequency build-up happens in corners. So, you need good treatment acoustically to avoid any issues.
Absorption Panels
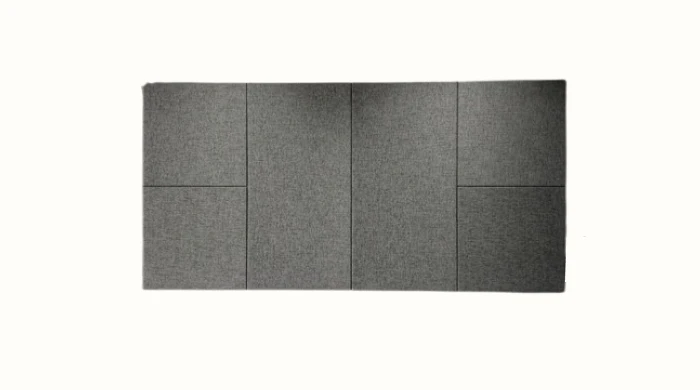
Absorption panels are for mid and mostly high frequencies and they hang on walls and ceilings.
Although in some studios the whole area of walls is covered with panels, it’s recommended to leave some untreated areas on the wall for more natural sound.
Because they absorb sound, you may get a dead room. Which is not what we want to achieve. We want to create a natural-sounding room but at the same time, an acoustically pleasing environment.
Diffuser Panels
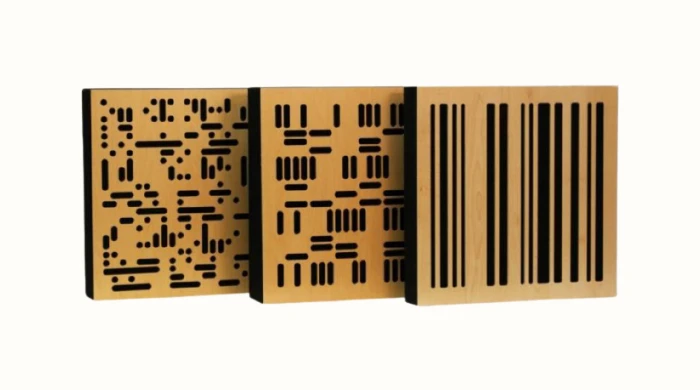
And diffuser panels are great for retaining natural sound in a recording room because they don’t absorb all the sound.
They reflect some of them and because of that, it’s better to have some diffuser panels in your room. This will allow you to have a more natural room and not a dead room.
Absorption and diffuser work well in combination so, you need to have both of them on the walls. But absorption panels should be more in your room than diffusers.
How To Do Acoustic Treatment For Home Studio
As long as you understand how different types of acoustic panels work, it’s time to learn how to place them in your room.
The proper placement is critical for a good-sounding environment. In this guide, you will learn how to treat the recording room acoustically.
How To Place Bass Traps
Bass traps are the most important acoustic treatment solution for recording studios because low frequencies are the hardest to control.
Especially for the home recording environment because our house and rooms are not made for recording.
Bass traps need to cover as many corner spaces in our room as possible. If you manage to cover every inch of corners, better. But you have to cover at least 60% of the corner space in your room.
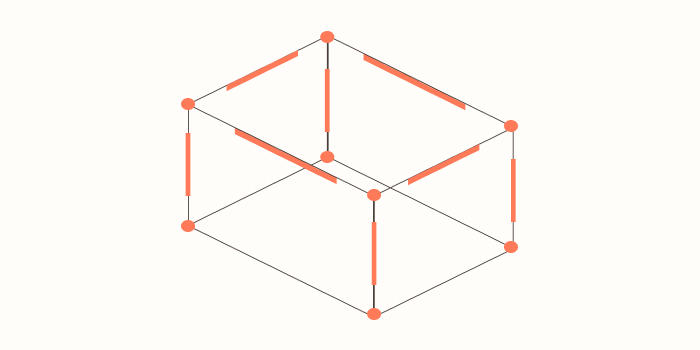
First of all, place bass traps in every corner where two walls and the ceiling join. Also, cover corners below it, where two walls and the floor join. This is eight corners in total. And there are specific bass traps for that.
This is important because these corners are the places where low frequencies build up the most. So, you need to treat them acoustically first.
After that, you have to cover vertical and horizontal corners with bass traps. If you cover the whole space, it’s good. But if you don’t have that much budget, cover at least 50% of the area.
You can do it in different ways. You can get a long bass trap and place it in the center of the corner to cover some space.
Or, you can cut it in half and place one a little left and another one on the right side. The goal is to cover most corner areas of your room.
We want to absorb as many low frequencies as possible to avoid any bouncing on low-frequency build-up.
Although irregular shapes are not recommended for recording studios, if you have them, try to cover the corners these shapes create.
How To Place Acoustic Wall Panels
After corners, you need to apply acoustic treatment to the room walls. This way you will control high frequencies and avoid bouncing sound and echo.
Wall treatment is very important and you have to know how to do it. There are several rules you should follow to get the best results.
Poorly treated walls cause issues and are not suited for recording and even more for mixing.
First, you have to choose what shape of the acoustic panel you want to use. There is a square acoustic foam treatment which is cheap and doesn’t do a good job. Also, you have to buy a lot to cover wall space. Especially in big rooms.
The second and the best panels are rectangular shape panels. They are long, cover more space, and are better absorbers. I recommend you use them.
Now, the first thing you should know is to leave a gap between the wall and the panel.
The sound goes through the panel and hits the wall. It loses the power and when a bouncing wave hits the back of the panel, it has not had enough power to go through it again and the panel catches it.
So, it’s important to leave an approximately 2.5″ gap between the panel and the wall. If you place the panel very close to the wall, it won’t have that much impact, and the room sound won’t be that great and natural.
The next important rule is the acoustic panel placement on the wall. Many beginners make mistakes here. Some of them cover the whole area of the wall with panels and some of them hang them in the center. There is a better way to do it.
The best pattern for wall panels is a zigzag. And this is for longer walls. This is when you hang one panel higher than the second one and you follow this pattern to the end.

Draw a line in the middle of the wall to divide its height into the exact length. Then make sure that two-thirds of each panel goes above or below that line.
You do this on both long walls but you do it upside down for the opposite wall. If the first panel in a row is above the line on the first wall, it should be below the line on the opposite wall, and so on.
This way panels will cover the most space possible and also the room will be more natural sounding.
On the shorter walls, you can hang panels in the center of the wall. It doesn’t need to be a zigzag.
For example, on the wall where your workstation is, you can hang two panels behind studio monitors and that will be enough.
And on the opposite wall, depending on the length of it, you can hang two or three panels in the center.
And the last thing you should consider is combining absorption and diffuser acoustic panels. If you use only absorption panels, it’s good but you may get a very dead-sounding room. Because they absorb the sound.
But when you mix diffuser panels, some waves will bounce and it will create a more natural-sounding environment. Try to have at least one diffuser panel on each wall. If a wall is long, you can use two diffusers there.
How To Place Acoustic Ceiling Panels
After corners and walls, you need to apply acoustic treatment to the ceiling. It’s much easier and less complex. The ceiling doesn’t need diffusers but you can still use them if you want. In general, absorption panels are enough for walls.
The placement is the same. There should be a gap between the panel and the ceiling. But it can be greater than 2.5″. You can hang them on a long rope or something. Like you hang a chandelier or light bulb.

The goal is to minimize bouncing sound waves from the ceiling. So, you can cover most of the ceiling area. But it doesn’t have to be a zigzag pattern. Just place panels next to each other in a couple of rows.
But if you have enough material, you can make the entire area of your room ceiling soft. Many people don’t even use professional sound treatment panels for ceilings. They cover it with everyday life items like blankets, pillows, or mattresses.
Although it can work, professional acoustic panels are better because they are made specifically for acoustic treatment.
Floor Treatment And Studio Furniture
Many home studio owners have discussions and argue about floor treatment and furniture placement in studios. There are no right or wrong ways to do it and debates will continue. Because it may work in one studio but fail in another one.
In general, the floor doesn’t need any treatment. In fact, a hard floor is better for sound. You don’t need to cover every inch of your recording room with panels because the sound will be unnatural. You need some bouncing sound waves.
Also, many people use carpets in studios. It’s not a problem but carpets tend to absorb only high frequencies and it may cause some sound-related issues later.
The same goes for studio furniture. You can place furniture such as a couch or bookshelves in your home recording room and it will cause nothing bad. A couch is soft and it will be a natural treatment for a room. Books also can be used as a natural sound absorber.
But in general, it’s recommended to have fewer items or furniture in a recording room. Just what’s necessary. But if you add furniture or something else, make sure that it has a soft surface to use as a natural sound treatment.
Conclusion
The proper acoustic treatment for a home recording studio is critical. Because houses and rooms are not designed for recording, you have to make them great for recording and mixing. And acoustic panels are the best way to treat recording rooms acoustically.
There are many options to choose from. You can choose panels made from different materials, get them in different sizes, or even build one yourself and make custom panels specific to your room.