Mixing the piano properly might be a challenging task. A good tone for the piano is very important for the song. Especially, if it’s the main instrument.
Whether you record real or virtual piano, the approach is almost exactly the same. Real piano requires additional techniques such as mic position, and type of room while a virtual piano is more convenient.
In this post, you will learn what it takes to mix piano. How and where it should be in the whole mix, how to use EQ and compressor correctly, and other helpful tips.
7 Steps To Mixing Piano
It’s impossible to explain each step of mixing piano because there are no rules and every case is different from the others. But here are the steps you can use as a general guideline and learn how to mix piano.
1. Good Source Sound

The first thing you need to think about when mixing piano is the source sound. This is the most important step. If a piano recording doesn’t sound good from the start, it still will be bad after mixing.
Take your time when recording piano and try to record the best sound you can. If you record real pianos with microphones, try different microphones, mic placement, etc. For virtual piano, you must find the best-sounding and most realistic virtual piano plugin.
If you don’t capture a good sound from the start, you won’t be able to make it better afterward. Compressor, EQ, or any other plugin won’t help. Because if a piano sounds bad, it will always be like that.
So, no matter what instrument you record, the source sound must be good. Also, it must sit well with other instruments in the mix. Don’t rush. Take your time and capture the best sound you can.
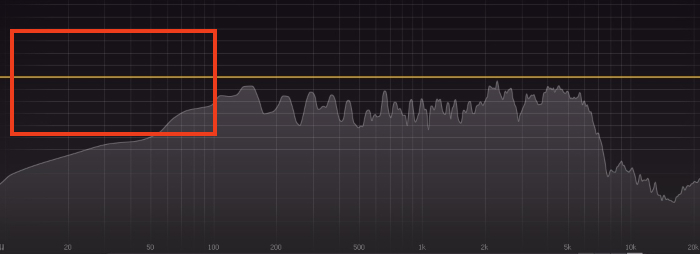
2. Remove Excessive Frequencies
Every instrument has some frequencies that should be removed. These are very high and low frequencies. They are there but you don’t need them because human ears can’t hear them.
To remove these excessive frequencies you need to use high-pass and low-pass filters. Most modern EQ plugins offer dedicated options for HPF and LPF. It will create EQ bands that are specific to filters.
The filter amount depends on the piano sound. Some piano tones might have more frequencies than others. So, the EQ band will be different for each piano. You should listen carefully to the sound and make wise decisions.
The goal is not to change the sound. The main goal is to remove just the right amount of frequencies. Very lows and highs we don’t hear but they add unnecessary energy to the songs.
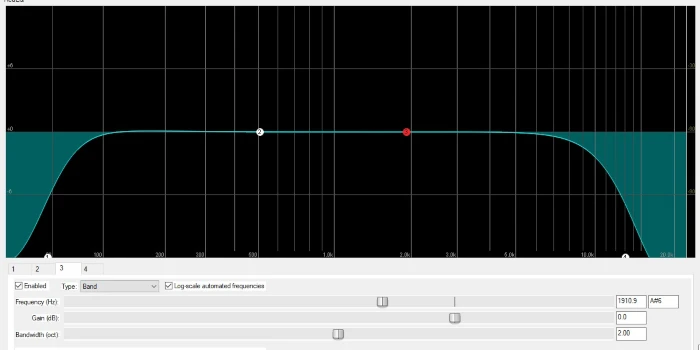
3. Boost Good Tone
After the frequency clean-up, it’s time to boost the good frequencies to enhance the juice of the piano. Just find where it sounds the best and boost it but don’t overdo it. About 2-3dB should be enough.
The easiest way to boost piano frequencies is to create a narrow EQ band and swipe it across the frequency range. Once you find the good-sounding spot, make the band wider and boost it to about 3dB. If it’s too loud, lower the decibels.
There might be a couple of good spots for piano. You need to find as many good-sounding frequencies and enhance them. But also don’t forget to leave space for other instruments.
If other tracks sound good in the same range, you need to choose which one is more important and boost it. For example, if the guitar occupies the same frequency as the piano and the guitar is the main instrument, boost the guitar and cut the piano.
The goal is to boost the frequencies of more important tracks. It might piano, guitar, or any other instrument. It all depends on individual songs.
4. Leave Space For Other Instruments
After boosting, it’s time to cut some frequencies that don’t sound that good. The approach is the same – create an EQ band and find the spot that doesn’t sound good and cut it.
But for the frequency cut, the EQ band should be narrow and very subtle. Don’t cut too much and try to not exceed 3dB. If you cut too much, the piano will sound dry and lifeless.
Also, frequency cuts on piano tracks can enhance other instruments. When you cut one track, another instrument occupies that frequency. So, always have it in mind when mixing piano with EQ.
5. Control Low End
Even after you do all the EQ tweaks, there will be some low frequencies that need to be controlled. Low frequencies add the most energy to the song but it’s not always good sounding.
Also, other musical instruments such as bass guitar or kick drums live in that range. Because of that, there might happen a low-frequency build-up. You should always avoid it.
One thing you can do is add more EQ bands in that range and maintain the low end. Dynamic EQ would be a great choice for that. Alternatively, you can add a multiband compressor and compress only that area.
Whatever tool you use, the goal is to control low frequencies to avoid build-up. This way piano sound and the whole mix will sound cleaner and clearer.
For that, you can use a piano EQ cheat sheet to know important frequency spots and ranges for the piano.
6. Apply Smooth Compression
A compressor is a very delicate tool. It can do a good job but it also can ruin the mix. Compressors make the sound more consistent and even but too much compression can destroy dynamics.
Also, I personally don’t like too much compression on pianos. It changes the sound in a bad way. So, when I use a compressor plugin with a piano, I am very careful and subtle.
As a general guide, I start with a 2:1 ratio and almost never increase it. A threshold is different in every case but it’s very mild. I just want to capture the highest peaks. This way I can control the sound more and also avoid low-frequency build-up.
And finally, I like to use relatively slow attacks and medium releases but sometimes, I use fast releases. I just listen to the piano and it shows me what are the best settings for the compressor.
Your case might be different. So, the best way to add compression to the piano is to listen to the sound and it will tell you what to do. When you use compressors, rely on your ears, not on your eyes.
7. Add Space
And finally, to add space and air to your piano, you should use some kind of reverb plugin. If you have used a real piano, reverb might not be necessary. But with virtual pianos and MIDI keyboards, I always use reverb.
Don’t insert a reverb on the piano track. Instead, create a new track, insert reverb there, and then just send a piano signal to that track. This way you will have two piano tracks:
- One with dry piano sound with EQ and compression applied to it.
- Second, that same piano sound with a reverb plugin.
Now, you change the reverb settings on that second track. After you are satisfied with the sound, you just blend these two piano tracks together.
The first track is the main track. So, don’t change the volume. Just take the second track and blend it with the fader. It shouldn’t be too loud. Just bring up the reverb track and once it will add enough space and air, stop.
Where Should Piano Sit In The Mix?
To capture the best frequencies of a piano, minimalistic EQ is recommended when it’s the primary instrument but when it’s a background instrument, it should take a backseat to more prominent ones, with some lows and highs retained and cuts made around 1500Hz and 3000Hz to create space for others.
Does Piano Need Panning?
A stereo widener plugin can be used to make the piano sound fuller and wider. There are different ways to achieve this effect, such as using a stereo imager plugin or applying a reverb. If the piano has been recorded with multiple microphones, the microphone tracks can be used to create a wider sound.
Conclusion
As you can see from this tutorial, mixing the piano is pretty much the same as mixing other musical instruments. You need a good source sound, and plugins such as EQ, compressor, and reverb. You can use other tools such as widener, saturation, modulation, etc.
If you have never recorded or mixed piano before, the best way to master it is to practice. Download some free virtual piano plugins, record some demo songs, and try to mix them. The more you practice, the better piano mixes you will create.