You recorded your song, you mixed it, and you liked how it sounded. Now it’s time to master a song. Mastering makes songs louder and more awesome.
Today we have all the tools that are necessary to master our songs at home recording studios. Like recording and mixing, mastering at home became very easy.
Mastering is the easiest step and I’m here to show you how to do it properly. I will explain how to make your songs radio or Spotify-ready.
If you have read my song recording and mixing guides, now you are ready to learn how to master songs and make them great.
When Is Song Ready For Mastering?
Before you master a song there are a couple of things to check. You have to check if the file is in the correct format with the correct export settings if the volumes are correct, and if it sounds as you want it to.
First, make sure your mix file is in WAV format. Also, depending on your settings, it might have various configurations. But the most common is that it should be in a 44.1 kHz sample rate with the 24-bit stereo format. But it might be in 16-bit or 32-bit. Depends on your recording and DAW settings.
Next, make sure that the result you have is final, that you love what you are hearing and you don’t want to change everything. It’s very important because once you start mastering, there is no way back.
Lastly, it is essential to leave headroom in your final mix for the mastering process. When mastering, the goal is to enhance the overall loudness of your song. Consequently, you increase the volume of your track up to its maximum threshold.
And if it doesn’t have a headroom, there will be some issues. Mainly, clipping issues.
To make sure that it has a good volume for mastering, just open a new project, insert your WAV file, and on the master bus meter, it should be around -6dB to -8dB. This is enough headroom and you can start mastering.
Also, if you mixed the song, you can check the volume before exporting your mix.
How To Master A Song
Now, you know what to check before you master a song. It’s time to open the project, create a track, insert our WAV mix file, and start mastering. After it, you can freely publish your songs.
1. Listen To The Mix

The first step in mastering is listening. You have to listen to your mix in its entirety because you have to know your song well. Understand how it sounds and what it feels. How instrument levels are balanced, etc.
If you don’t understand what the song is about, it’s hard to master it. Some songs require loud mastering but some do not. Also, when you listen to your song, you will find out that there are some things you can do before making it louder.
So, always listen to your mix before the mastering session starts. And, listen to it a couple of times.
2. Apply Mastering EQ
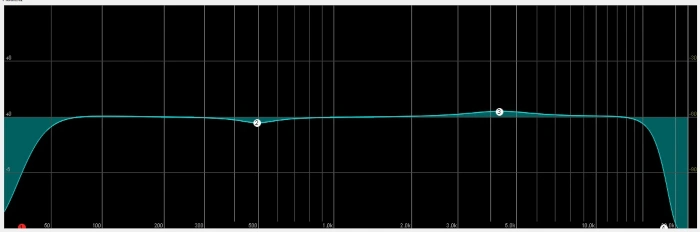
Using EQ is very common during mastering. But remember this – EQ tweaks during mastering must be very, very subtle. No dramatic cuts or boosts. Just subtle changes, and removal of unnecessary frequencies.
In general, when you do any boost or cuts during mastering, the level should be about 1dB or 1.5dB. You don’t need more. Because it’s not mixing.
You did all the edits during mixing. This is the moment when you just do additional, very few tweaks. Most of the time it’s just removing very lows a little and perhaps boosting highs a little bit. But depending on the song, it might require the opposite.
But many times you don’t have to do anything. But if you do, it must be subtle.
3. Add Mastering Compression
Like EQ, you may need compression when you master a song. There is a better chance that you will need a compressor more than EQ. But like in the case of EQ, you need very few compressor tweaks.
Many compressor plugins have features or presets for mastering. For example, the FabFilter Pro C2 compressor has it. If your compressor plugin offers a mastering feature use it.
If not, what you need to do is to compress your mix, not more than 1 or 2dBs. Sometimes less is enough. Just subtle compression to make it even more cohesive.
Also, many times engineers use dynamic compressors. A dynamic compressor gives you the option to compress different frequencies. You just select the section on the frequency range and compress only that part.
With this capability, you gain the power to compress low frequencies, midrange frequencies, and high frequencies individually. Dynamic compressors prove to be an excellent choice for mastering as they allow targeted compression where it is needed, rather than applying compression to the entire mix.
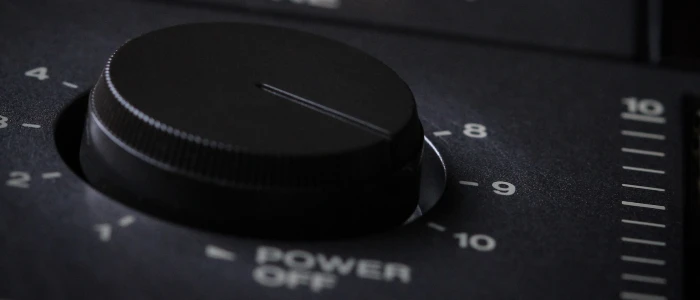
4. Use A Limiter
Now we came to the real mastering. And this is when you put a limiter on the track and make it louder. But be careful with the limiter because it can ruin your mix and your song will sound awful. But if you use it correctly, then you will get great results.
Imagine a limiter as an unlimited compressor. It compresses the sound but makes it louder. You have to understand the features of the limiter and how it works before using it.
Most limiters work the same way and have similar features. Perhaps the names of those features are different. The main controls of the limiter are a gain control which makes your mix louder, it may have a visual for audio wave, gain reduction, and volume meter.
By gaining control, you increase the sound level of your mix. On the visual display, you will see how it affects the sound and with it, you can control the clipping.
Clipping in the digital recording means when audio reaches 0dB, it cuts the sound and has digital sound. We call it digital clipping. And you need to avoid it. So, increase gain control until it starts clipping. In other words, you have to find the sweet spot.
Like in compressor plugins, there will be a gain reduction bar. There you will see the gain reduction in decibels. Depending on your song and gain, it will be different.
So, your goal is to make your mix louder by increasing the gain control but avoiding the digital clipping. In other words, you push the limits of your mix when you master a song.
5. Choose The Loudness
Another essential thing in mastering is the volume level. And they measure it in LUFS. Depending on where you are going to upload your song, you need a different LUF volume.
For example, Spotify and Youtube stream audio at -14 LUFS. If your song has a different LUFS level, it will automatically increase or decrease to -14 LUFS. Apple Music requires -16 LUFS, Amazon needs -14 LUFS, and so on. So depending on where you plan to upload, you master it accordingly.
And it’s very easy to measure LUFS in modern limiter plugins. Most of the best limiter plugins have an option for LUFS. For example, FabFilter Pro L 2 has a LUFS feature built-in. If your limiter doesn’t offer it, there are great LUFS plugins you can get.
In FabFilter Pro L 2 you will see the LUFS level meter on the far right side. There you can choose which level you want to master your song to and make gain increase accordingly. The goal is to increase the gain until you reach the desired LUFS volume. For example, the -14 LUFS for Spotify.
Pro L 2 limiter makes it very easy. But many other limiter plugins offer these features these days. So, you have the advantage and make your song ready for various streaming services.
6. Final Check For Clipping
So, when you increase your mix sound level and it’s not clipping, now it’s time to listen to it a couple of times and make sure that everything is correct. If something is not sounding good, it’s the best time for editing.
The best practice for mastering and even mixing is to take short breaks. Because your ear is constantly receiving loud sounds, it needs a little rest. So, take breaks during mixing and mastering. Let your ears relax.
For example, when you finish your mastering and you plan to listen to make final edits, take about a 20 or 30-minute break. Go outside, and eat some snacks. Your ears should relax before listening.
After the break, with fresh ears listen to your track again and find out if anything is wrong with your track and make changes to it.
Breaks are important when you master a song. You will make better decisions and your track will sound much better.
7. Export The Song
And the last step before uploading your track to the streaming services is to export your song. But do this after you are sure that your song sounds as you want. You must be satisfied with your mix.
A very common practice during mixing and mastering is when people listen to their mixes in different speakers. If you mix your songs on studio monitors, listen to them in headphones, export them, and listen to them in your car.
You may find out that although your mix sounds great at your home studio, it might not sound that great in the car. You hear that the bass is too loud or boomy. So, go and make tweaks to your low end. Then check again and so on. This will help you to make songs that sound great in every environment.
After you master a song, it’s time to export your song. Some DAWs don’t offer export in MP3 format but if your DAW has the option, great.
But if you use something like Reaper, it has no MP3 feature. In this case, you export in WAV format and then use an MP3 converter to convert your WAV file to MP3.
And that’s it. You have recorded, mixed, and mastered your song. Now you can upload it anywhere you like and share it with the world.
Conclusion
Mastering is the last step in song-making. Today, thanks to modern technology, we have the luxury to master a song at our home recording studios. We don’t need to pay hundreds of dollars for that. We can do it with a laptop, digital audio workstation, and plugins. We can be engineers.