One tool that can make songs more powerful and radio-friendly is an audio limiter. It’s a mastering tool that does magic.
But most times limiters are misunderstood and used incorrectly. And it can ruin your whole mix. You need to know how to use limiters.
And this beginner guide is for those who want to get to know limiters and have a basic understanding of how they work.
Let’s dive in and learn everything about audio limiters.
What Is Limiter In Audio?
An audio limiter is a tool that can enhance the volume of the mix. It gives an additional push to the sound. The limiter is the final and delicate touch to the mix and it’s the main tool in mastering.
Many times limiters are called hard or unlimited compressors. Although there are some similarities, they work differently. However, they have some similar controls. But the limiter is easier to work with.
Limiters don’t compress or make a sound even and cohesive. A limiter just pushes the sound to the maximum loudness. But misuse of it can ruin everything. If you push the limiter too far it will cause what’s called clipping.
How Does Limiter Work?
In a nutshell, limiters push the incoming signal and make them louder. With just one knob you can push the incoming sound gain to the desired amount of decibels. But it has other options for more control.
But loudness is limited. Depending on the mix headroom, you can push the sound to a different volume. But at some point, the sound will pass the threshold and will be squashed.
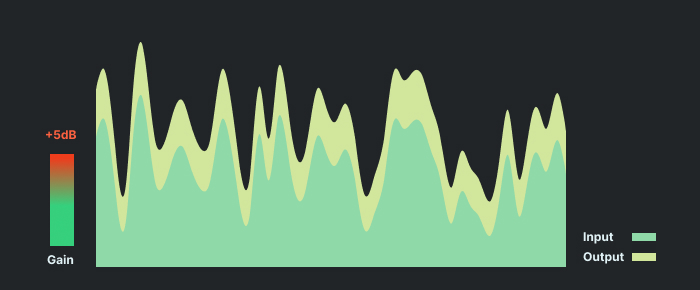
It will cause digital clipping and you don’t want that. The goal is to make the mix as loud as possible. But at the same time, as natural and dynamic as it can get.
Because too much limiting can make a mix flat and robotic. When you use audio limiters, you need to be careful. Also, make sure that your mix has enough headroom before starting to use the limiter.
Audio Limiter Controls
Various limiters have different control options. Some names can be different for each plugin. But in general, names are similar and they do the same thing. If you used a compressor before, the limiter will be familiar to you.
The limiter can have many different options but there are some essential controls you should know. Also, it’s a very minimalistic tool but does a great job.
Some basic options you get with limiters are input and output meters, visuals for the audio signal, gain reduction, etc.
Let’s see some of the most important limiter controls. How they work and how they can be beneficial to the sound.
Gain
The first and most important option in limiters is to gain control. With this setting, you determine the amount of loudness in decibels. Some limiter plugins use knob and others use fader control.
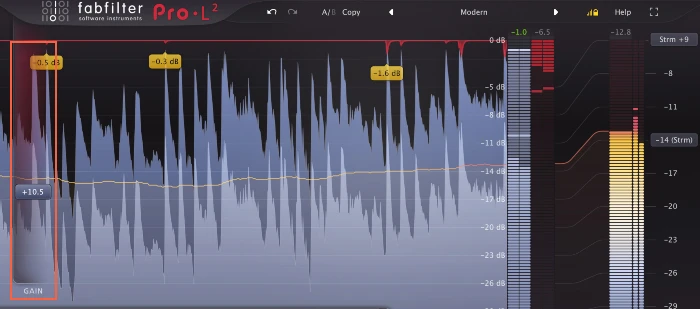
You can add as much gain as you wish but you need to avoid clipping. That’s why the headroom of the mix is important. The more headroom a mix has the more gain you can add with an audio limiter.
Gain control increases the sound until it meets the threshold or ceiling. After it passes the threshold, its sound will start digital clipping. So, you need to find the best spot where it is loud without clipping.
Ceiling
The ceiling in limiters – sometimes referred to as a threshold – is the maximum that loudness can go. You can set your ceiling settings. With it, you control the sound level and it’s easier to avoid clipping.
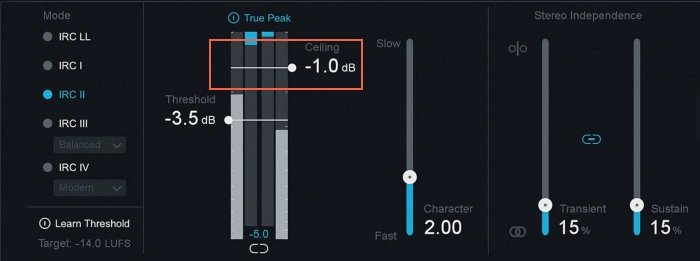
In general, the ceiling is set to -1dB or you can go lower. It is set before you use gain. With the ceiling, you tell the limiter that sound mustn’t pass that point. It gives you more control.
Some plugins may not have a ceiling. Many simpler plugins only have a gain knob. But the ceiling is a great option to have. It makes limiters more flexible. Try to find the plugin with the ceiling option.
Attack and Release
Limiters, like audio compressors, have options for attack and release. If you have used a compressor then you know how attack and release work. But it’s an optional setting and many limiter plugins don’t have it.
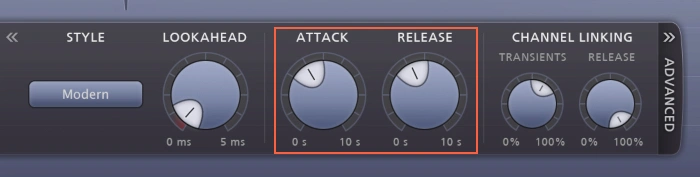
With an attack, you control the time when the limiter should start working. And with the release, it’s the opposite. You tell it when it should stop working.
Although these options exist, they are not used as frequently with limiters. But these two settings are other options for more control.
True Peak
True peak is not a setting but rather a meter and control. The true peak is the loudest point of the audio, which is 0dB. If a sound goes above 0dB, it starts clipping. That’s bad and True Peak is the tool that helps.
Some plugins such as FabFilter Pro-L 2 have true peak limiting built-in. You can switch it on and it will make sure that no clipping happens.
If you want to know more about true peak limiting and have in-depth knowledge, you can read this post.
LUFS
Another great option is LUFS. Some audio limiters come with these options and there are separate plugins only for LUFS. It’s a great tool, especially for streaming services.
LUFS (Loudness Unit Full Scale) is an audio signal level measurement. With it, you can choose different LUFS levels and master your song with limiters according to those settings.
It can come in handy in many situations. But it’s great if you upload your music on streaming services such as Spotify, Deezer, or even YouTube. Because these services require different LUFS levels.
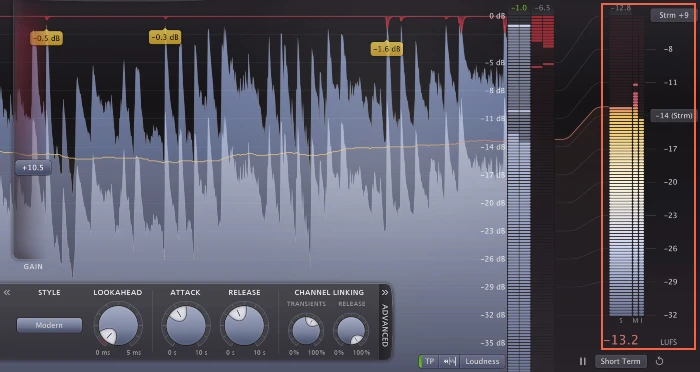
For example, when you upload a song on Spotify, no matter the audio level, it automatically converts it to -14LUFS. If your song has -10LUFS it will convert to -14LUFS. The same works with the lower LUFS level.
And that can be damaging to the quality of the sound. You need to export your songs in the same LUFS as your streaming service requires.
That’s why this option is very handy. If your limiter plugin has it, that’s great. If not, you can use a separate plugin for LUFS.
Conclusion
Audio limiters are great and mandatory tools for creating great songs. It’s a mastering tool that makes mixes louder and radio-ready. But you can use it during mixing too. It is an easy tool to use and adds power to the sound. This guide will give you a basic understanding of how it works. Then you can use one of the plugins and understand it more.