In the music world, an audio compressor is one of the most important tools. Without compressors, there wouldn’t be great songs.
Compressors make songs more balanced, and consistent, and they add power. They are used during the mixing process and almost every instrument needs a compressor.
Although a compressor can make a song greater, it can also make it lifeless and dull if it’s used incorrectly.
In this ultimate compressor guide, you will learn and understand what a compressor is and how it works. When you understand the fundamentals, you will be able to use them properly and create awesome mixes.
What Are Audio Compressors?
An audio compressor is a dynamic tool that makes audio waves consistent and even. It compresses the audio signal and reduces the dynamic range. Overusing compression can make audio dull and lifeless.
Every audio signal whether it’s a vocal or an instrument is very dynamic. It has highs and lows. And the song must be dynamic and natural. But the untreated sound is very unbalanced and inconsistent.
That’s where a tool like a compressor becomes handy. It helps instruments and the whole song to be consistent and balanced but still dynamic. And that’s the main goal. We want songs to be punchy, and balanced, but dynamic and alive.
Digital vs Analog Compressors
Like many things nowadays, compressors can be digital or analog. Digital compressors are becoming more popular in this digital recording era. They are cheaper, easy to use, and require no maintenance.
For example, compressor plugins are digital. They are programmed and do what the compressor should do. Some digital compressors are based on a real, analog compressor and emulate their sound.
On the other hand, an analog compressor is an actual device. It has inputs, outputs, and all the controls you need. Also, it’s called an outboard compressor. You have to install it on the rack and connect it to your computer and DAW.
In general, analog compressors have a more natural sound. They affect the sound in a good way and add flavor to it. And digital compressors are cleaner. What sounds go in, the same, unaffected sound comes out.
But many digital compressors emulate famous analog compressor sounds. So, if you love old, analog sounds, you can always use them.
What Does An Audio Compressor Do?
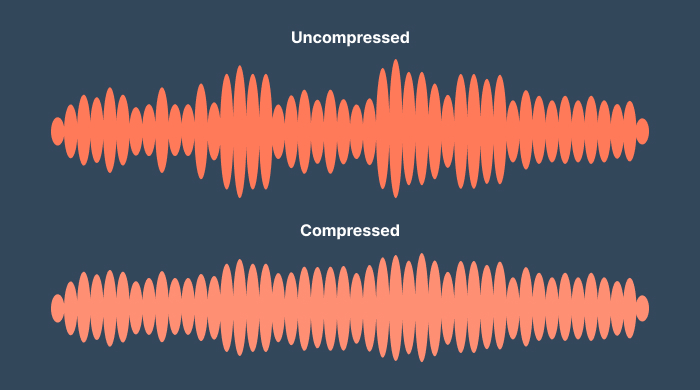
The audio compressor reduces and compresses the high peaks of an audio signal. It smoothens the high peaks and makes the signal better for listening. But at the same time, it brings up the low parts of the signal.
So, an unbalanced, dynamic signal becomes more consistent and even. If you look at compressed and uncompressed audio signals, you will see that the audio wave of a compressed signal is more even.
A great example is the bass guitar because it’s a very dynamic instrument. When you record bass guitar and listen to it, some parts will be too loud and some too quiet. And in the different parts of the song bass could be lost in the mix.
But when you add a compressor to the bass, it will compress the loud parts and make the quiet parts louder. So, it will become even and consistent. You will hear the bass all the time. And it will still be dynamic and natural.
But because it compresses loud parts and brings up quiet parts, too much use of the compressor can make the sound very flat. So, when you use a compressor you have to be careful. We want our song to be even and smooth but also dynamic and alive.
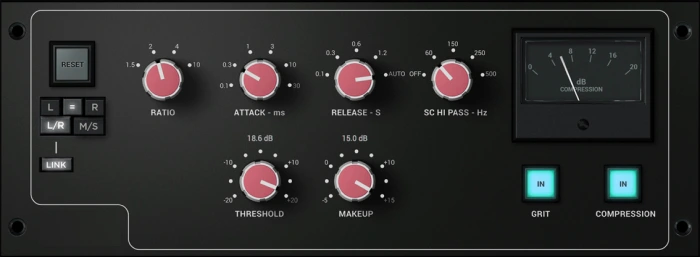
Audio Compressor Controls
Compressors have different controls and settings you can tweak to get the desired results. Most compressors have the same controls. Some are simpler and have fewer options. Also, the names of the controls can be different.
But all compressors work the same way. They compress sound, reduce the dynamic range, and make the sound more even and balanced.
Let’s understand the basic controls of an audio compressor and what they do and how they affect the sound.
Threshold
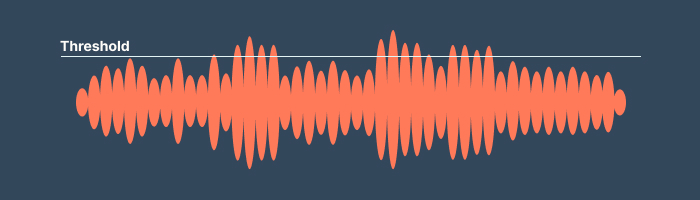
The first option in compressors is the threshold. It’s a setting where you tell the compressor when it should start compressing the sound. Threshold measures in decibels.
For example, if you set the threshold to -10dB, it means that when the sound exceeds -10dB, the compressor will turn on and starts compressing the sound. But if the sound never goes above -10dB, the compressor won’t have an impact.
Threshold allows you to control the compression of a sound. You can control the dynamic range of your instrument. Find the good spot and set the threshold to compress found but maintain the dynamics at the same time.
You don’t need to set the threshold too low. In that case, the instrument signal will always be compressed and that’s not what you want. You need to have a natural, balanced sound.
Ratio
The ratio is another very important control in compressors. With ratio, you tell the compressor how hard it should compress the sound. In other words, how much it should squash the sound. You can set very mild or very hard compression.
Most compressors have ratios like 2:1, 4:1, 8:1, and so on. For example, the 2:1 ratio means that when sound exceeds the threshold of 2dB, only 1dB is outputted. So, if your input signal is 8dB, the output will be 4dB.
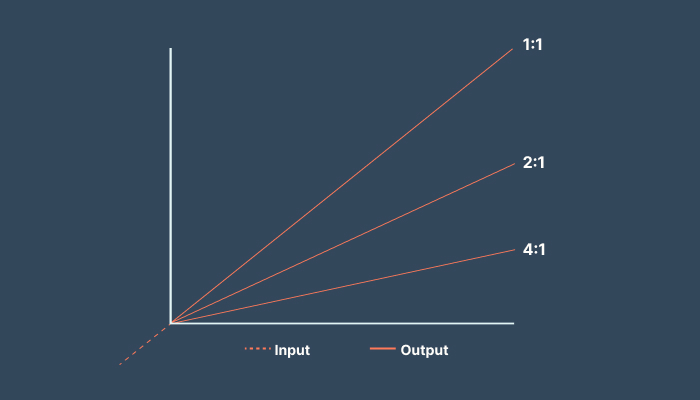
More ratio means more compression. Also, you can have an infinite ratio. And there are no rules. The ratio and every setting are depended on the instrument and the song.
The goal is to make the sound even, and consistent, but retain the dynamics. Too much compression will make it sound robotic and unnatural. You can control it with ratio and threshold.
Attack
The attack is another control option in an audio compressor. With the attack, you can tell the compressor when it should start compressing. You measure the attack setting within milliseconds.
For example, you set your threshold to -5dB and attack to 0.3 seconds. When the sound goes above -5dB, the compressor won’t start compression immediately. It will engage after 0.3 seconds.
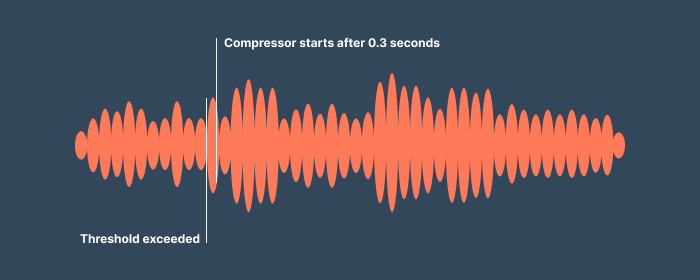
This way you have full control over your sound. If you want to compress the sound immediately, you can set the attack to 0.
For different purposes, you can set different attack options. Everything is depended on your taste and your music.
Release
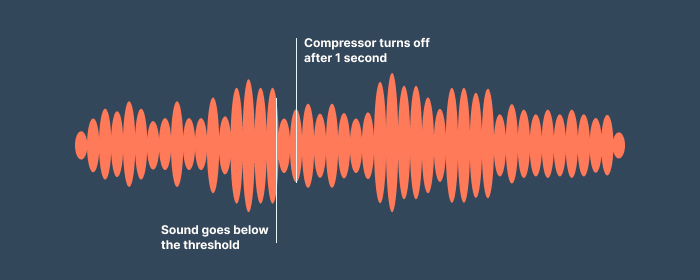
The release is very similar to the attack but reversed. With the release, you control when a compressor should turn on. And like attack control, it is measured by milliseconds. You can cut compressing immediately or leave the tail.
If a release is set to 0, the compressor will turn off as soon as the sound goes below the threshold. But if you set it to for example 1 second, the sound will be compressed for 1 second after it goes below the threshold.
With attack and release, you can control the behavior of a compressor and its impact on your sound. These two options are simple yet powerful.
Knee
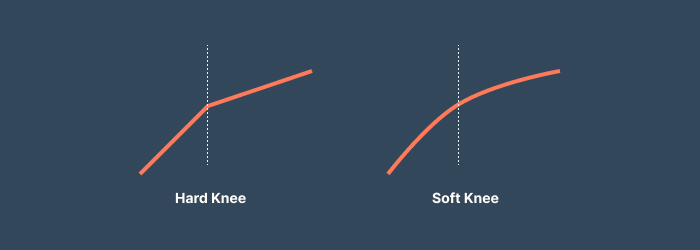
Another option with compressors is for the knee. This tells the compressor how hard or smooth should it be. Most modern VST compressor plugins have the visuals for the knee and you can see the impact.
If you set the knee to smooth, it will have a little curve, and compression won’t be that hard. But if you want a hard compression, then you need a smaller knee. Compression will be harder.
In general, you can set the knee to default or neutral. It has not had that much of an impact on the sound. Or incorrect use of it could cause issues. So, leave it in the middle and you will be fine.
Makeup Gain
And the last important setting of an audio compressor is the gain control. Many times it’s called the makeup gain. It controls the final output of the signal after it goes through compression.
When you apply compression to an audio signal, it reduces the output of that signal. You can see it on the gain reduction meter. Every compressor has meters for input and output signals and also for gain reduction.
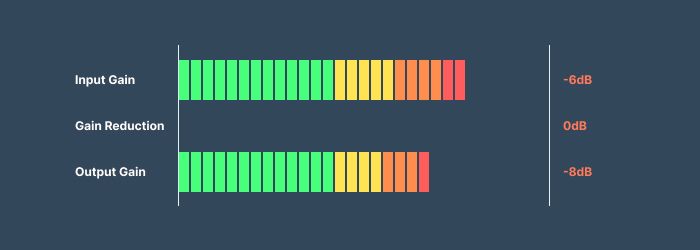
It will show how much dB of reduction the signal has after the compression. And if a gain reduction is -2dB, it means the output signal is also 2dB lower than it was before.
Because your output signal is 2dB lower after compression, you will raise it by setting the makeup gain to 2dB. Now, your input and output signals will be the same as before compression but they will be compressed.
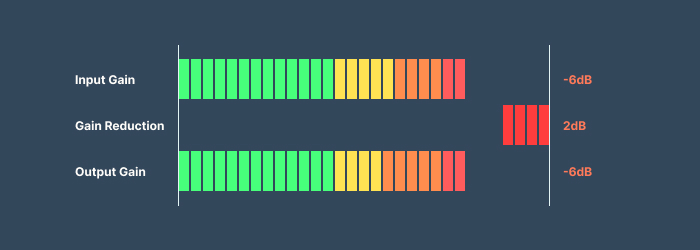
Input and output signals must be the same as it was before the compression. That’s very important. And you can control that with makeup gain.
Audio Compressor Types
There are various types and kinds of audio compressors. Every audio compressor has its own use case. Some are more powerful, some have simpler, minimalistic options, and specific characteristics.
Compressors come in different formats. There are analog, outboard compressors. Tube compressors are more expensive and they tend to add their character to the sound.
Also, in this era of technology, we have numerous compressor plugins we can install and use with our DAW. Some plugins are based on famous analog plugins and emulate their sounds.
Some of the most popular styles of compressors are:
- VCA Compressor – Very responsive and aggressive. Great for controlling rhythmic sounds.
- FET Compressor – They have a quick transient response. Good choice for drums and vocals.
- Optical Compressor – Offer higher ratios and smoother compression. Really good choice for mastering.
In general, all compressors are great for any instrument or vocals. But there are some special types of compressors that are great for specific applications and have unique features.
Bus Compressors
Bus compressors are great tools that have a specific use and can make songs more cohesive and glue it together. Bus compressors typically are used on the master track. It’s the final touch during the mixing process.
A real mixing console has a dedicated bus compressor. And every bus compressor is based on famous SSL console compressors. They emulate the characters of the famous bus compressors.
These are very powerful tools that can make the mix better and more cohesive. You can use it at the end of the mixing session and also during the mastering.
Multiband Compressors
And the very special audio compressor is a multiband compressor. This could be used on tracks during the mixing or you can use it in the mastering process. Fabfilter has one of the best multiband compressors.
What makes a multiband compressor a special tool is that you can compress specific frequencies. You can choose sections on the frequency range and compress only that specific area.
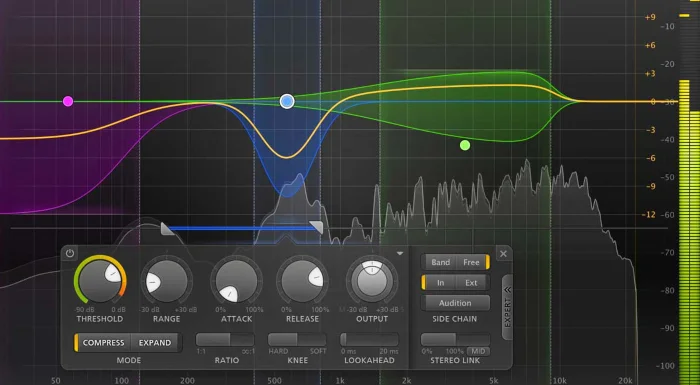
For example, you can compress only low frequencies, mids, or highs. Just choose the section and it will only compress that section on the frequency range.
These can come in handy in many situations. For example, on heavy guitars, where there is a palm-muted section. When you play palm-mute on distorted guitars, they tend to have an increase in lows.
So, instead of compressing the entire guitar signal, you can just pick the area where is a low-frequency accumulation and just compress that section.
Multiband compressors are really great and handy tools for every mixing and mastering project. You can use it on separate tracks or on the entire mix.
Conclusion
Like EQ, the audio compressor is one of the most important tools in the recording and mixing world. Compressors make audio more balanced, even, and consistent, yet retain the dynamics and sound natural. There are various styles and types of audio compressors you can have in analog or digital format.
Now you know and understand how compressors work and you can avoid mixing mistakes. Because incorrect use of compression can break the song and make it lifeless and unnatural.