After you record all the vocal tracks, it comes time for mixing and the first step is to EQ vocals.
Of course, EQ is not a magic tool – if the recording is not done well, you won’t be able to correct it with EQ or another device.
However, when you record a good vocal performance, you can make it much better with EQing.
EQing Vocals In 6 Steps
In this guide on how to EQ vocals, I will point out the important steps you need to follow to create professional-sounding vocal tracks.
1. Clean Vocals With HPF and LPF
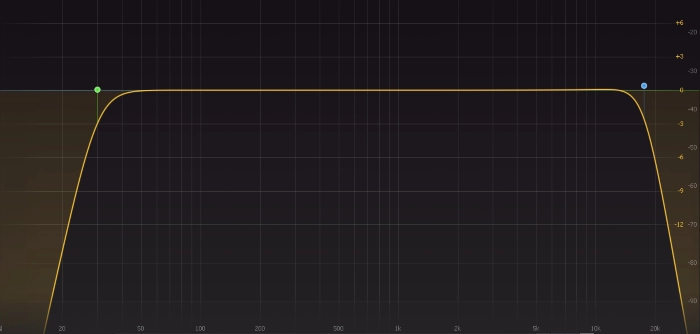
When you record vocal tracks – no matter how good they are – these tracks will have very low and high frequencies that require cleaning.
So, the very first thing to do when you use EQ on vocal tracks is to cut these unwanted vocal frequencies with HPF and LPF.
You are free to choose any plugin you feel comfortable with – it might be a specific EQ plugin for vocals – but in general, any good plugin will work.
Just insert it on the main vocal track, create HPF and LPF, and try to find the best spot for each EQ band.
The goal is to remove unwanted frequencies but retain everything else. Listen carefully and make sure you won’t cut more frequencies than needed.
Some plugins have the option to listen to the frequencies that were cut, so it will help you to know exactly what frequencies you are removing.
2. Remove Unnecessary Frequencies
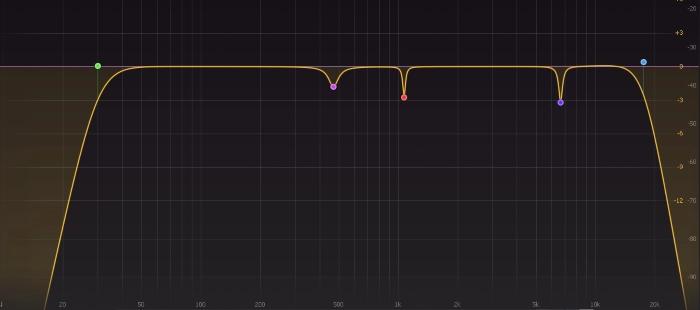
The next step to EQ vocals correctly is still removing frequencies, but this time it’s slightly different.
High and low pass filters will clean up vocals but there are still some spots that require removing.
These frequency spots could be in low mids, mids, and high mids and you need to find them. This is a very important thing if you want to mix vocals properly.
And the easiest way to find these frequencies is to create a narrow EQ band, boost it about 5-6dBs and slide it across the frequency spectrum.
Once you find the sound you don’t like, cut that spot and the Q value should be narrow. The dB value may vary from track to track but it mustn’t be too much.
You may need to do the same thing a couple of times. In general, look for areas around 400-500Hz, 1kHz, and 7kHz.
3. Boost Good Frequencies
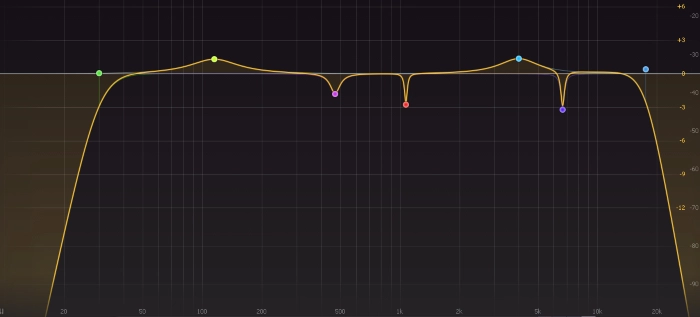
Now comes another important step in EQing vocals which is to find and boost good vocal frequencies.
The process is the same as in the previous step – create an EQ band and swipe it across to find good-sounding areas.
Look for areas such as 100-120Hz, 3-5kHz, and 10-15kHz because most of the time here are the fundamental frequencies for vocals.
Remember that when you boost any frequency, the Q value of EQ should be wider. This helps the vocals to be and sound natural.
As a guide, you can use the vocal EQ cheat sheet to know the fundamental frequency areas for vocals.
4. EQ Vocal Double
If you want to have a powerful vocal sound in your song, you should always record a vocal double track.
You may use it in the whole song or some parts such as the chorus. The goal of the vocal double track is to make it powerful and it also helps vocals to cut in the mix.
A vocal double is sung and recorded separately and it must be as similar as the lead vocal track.
And you EQ this vocal track after the main vocal track and the EQing process is the same – remove unnecessary and harsh frequencies and boost good spots.
The singer could have a perfect pitch but this track won’t be the same, so you might need to cut and boost slightly different spots than you did for the main vocal tracks.
What I want to say is that you mustn’t duplicate the same EQ settings on this track.
And while EQing this vocal double track, always listen to the lead vocal track because both tracks must fit together and they should sound like one.
5. Blend Lead Vocal With Vocal Double
A very important step after EQing lead and double vocal tracks is to blend them correctly.
To blend two vocal tracks means to use just volume faders, no plugins or other tools are required.
But the blending must be as perfect as possible – you need your lead and double vocal to sound like one vocal performance.
So, I hope before you started mixing, you covered the gain staging process and you have your levels all set up. But now vocal tracks might need some level tweaking.
The lead vocal track must be the prominent one but a double vocal track also should be almost as high as the main one.
However, the vocal double track mustn’t cause drastic changes in volume. Otherwise, it will ruin the mix.
So, make sure you blend them properly and they become a solid vocal sound.
6. EQ And Blend Other Vocal Tracks
And the last step for EQing vocals is to EQ any other vocal tracks such as backing vocals or vocal harmonies and then blend them.
This step should be quick and you don’t need to do surgical EQing – just clean up tracks from muddy or harsh frequencies. And after that blend them in the mix.
But blending might be tricky because it depends on what feel or emotion you want to evoke with your backing vocals or harmonies.
Also, it is very important what type of vocal mic was used for these tracks and what the sound looks like.
If you want these tracks to be prominent of course, you should increase the volume and if you want them to be subtle, then make it lower.
A good idea would be if you listen to your favorite songs with similar vocal harmonies or backing vocals and imitate them.
Conclusion
If you had a question about how to EQ vocals, here is the general but tested method for EQing different vocal tracks. Follow these steps, add your ideas or methods, and create songs with awesome vocal sounds because a good song must have good singing.