An acoustic guitar is a fun instrument to record. And the most important thing in recording acoustic guitars is mic placement.
No matter how good the acoustic guitar sounds or how perfectly you play. If microphone placement is wrong, it will not sound good when you listen to the playback.
In this tutorial, you will learn how to record acoustic guitars with a single microphone and also with two mics.
How To Mic Acoustic Guitar For Recording
Recording acoustic guitars may become frustrating. You may play great and have a great studio, and the guitar could be an expensive and great-sounding one. But that’s not enough. There is more to it.
You need to use good microphones to record acoustic guitars and more importantly, place them correctly. Good mic placement is critical to capturing the best sound acoustic guitar produces.
There are many different techniques and methods to record acoustic guitars. But in this guide, you will learn the method that will work with any situation.
It will capture the best sound possible even if your guitar is not the best in the world. The main goal is to capture the right frequencies and sound should be balanced.
Also, the recording process is crucial because it will make mixing acoustic guitars much easier.
How To Record Acoustic Guitars With One Mic
The easiest way to record acoustic guitars is with one microphone. It’s a minimalistic approach and works perfectly. Also, it’s a perfect method for beginners who have never recorded acoustic guitar with a microphone before.
You can use any kind of microphone – condenser or dynamic. The approach is the same. But for this tutorial, we use perhaps the most popular microphone ever – Shure SM57. It’s dynamic, very affordable, and great for almost every instrument.
The goal here is to capture as good sound as possible. So, it’s important where we place the mic and what frequencies it will catch. Also, a similar technique works when you record a ukulele.
And to do that, we have to try to aim the mic diaphragm away from the acoustic guitar soundhole. The reason is that the sound coming from the soundhole is very loud and boomy. It has huge low-end and unnecessary frequencies.
But we have to be careful. If we move the microphone too far from the soundhole, it will become very thin-sounding and that’s not what we want. We have to find the sweet spot.
There are two most common and very good single-mic placement methods when you record acoustic guitars with one microphone. Let’s discuss both.
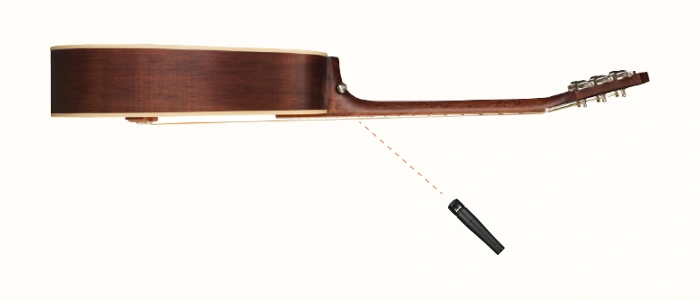
Acoustic Guitar Body Technique
In the first case, you need to place the microphone the way that the diaphragm aims toward the lower part of the guitar, under the neck. But not far from the soundhole or the tone will be too thin.
Place it on a stand and aim it at the edge of the soundhole, where it meets the end of the neck. But it doesn’t have to be in the center. Lower it a little bit down. A good spot is the lower part of the soundhole.
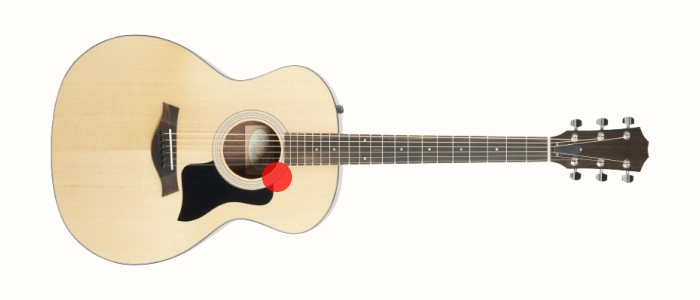
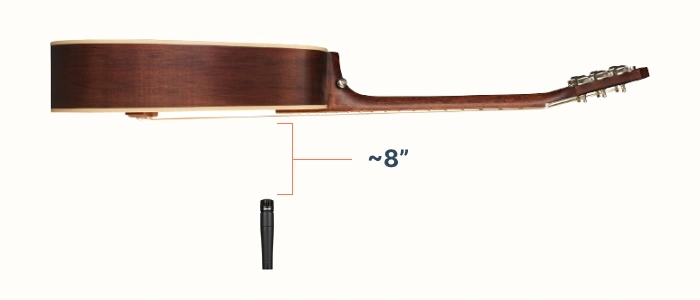
In general, the distance between the guitar and the tip of the microphone should be 7″ to 8″. But because every guitar is different, you may need to adjust the distance. Our goal is to pick up the best sound the guitar produces.
And finally, you have to adjust the angle of the microphone. If a microphone is aimed straight at the guitar body, the sound will not be that good. Especially, in the low end.
Start from a 20° to 30° angle and see how it sounds. This is a good starting point. You can adjust from here and find the best angle for your microphone. But in general, 20° is an optimal angle.
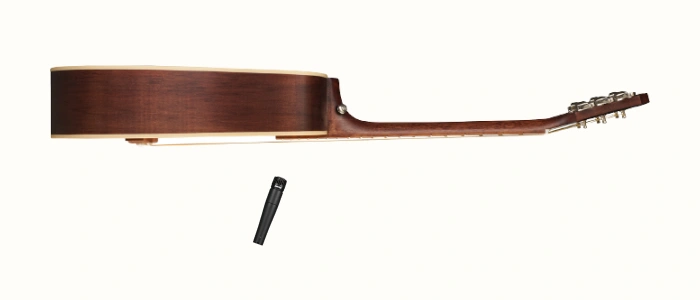
In this way, the mic will aim at the area under the guitar’s neck. That’s the spot you get the best sound from an acoustic guitar.
Remember that goal is to place the microphone away from the soundhole but not too far. We still need to pick up some sound from it. Tweak placement, distance, and angle combinations until you get the sound you want.
This method of mic placement may not work well with cutaway acoustic guitars. In this area, they don’t have that much wood. But the second method works perfectly with both styles – cutaway and non-cutaway acoustic guitars.
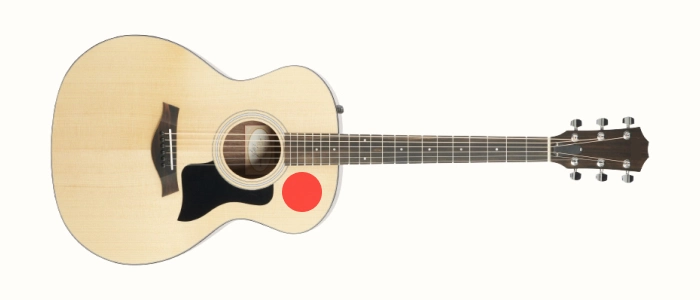
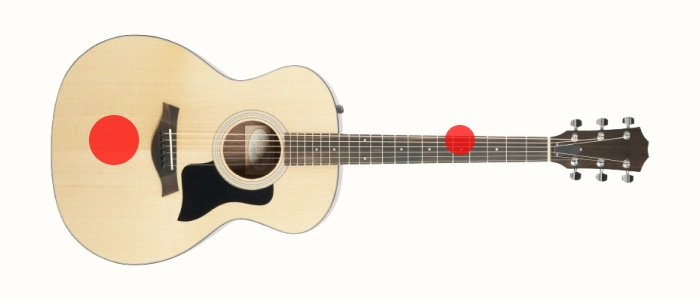
12th Fret Technique
The 12th fret technique is another very popular method to record acoustic guitars with a single microphone. It’s as easy as the previous method and works almost the same way. Only the placement is the difference.
The distance and angle are almost exact. In general 7″ or 8″ distance is great for this method and a 40° angle is a great starting point. The difference is in mic placement and aiming.
With the 12th fret method, you aim your microphone to the 12th fret of the acoustic guitar instead of its body. The microphone should aim at the 12th fret from the left side, not the right side.
This way a microphone will pick up the good tones of a guitar. It will have no boomy lows because it’s away from the guitar soundhole. But will pick up mid-range and high frequencies pretty well.
Of course, depending on your guitar, you may adjust distance and angle. But the distance of 8″ is pretty enough and starts from a 50° angle and adjusts accordingly.
This acoustic guitar recording method with a single microphone will work with any guitar. And because of that, it’s a more popular method than the first one.
How To Record Acoustic Guitars With Two Mics
For a more rich and more diverse sound, you can record acoustic guitars with two mics. You can use the same type of microphone or different types for richer sound. A dynamic and condenser mic will be a great combination.
This method is more sophisticated and aimed at more experienced recording engineers. If you are a beginner, you should start with a single mic and then try the two-microphone recording method.
When you record acoustic guitars with two microphones, you get a fuller and richer sound. The reason is that you can place them in different positions and pick up lows, mids, and highs. The whole spectrum.
Also, if you use different types of microphones, your sound will be richer and have depth. Especially if you use a condenser microphone. But for simplicity, we will use dynamic mics for this tutorial.
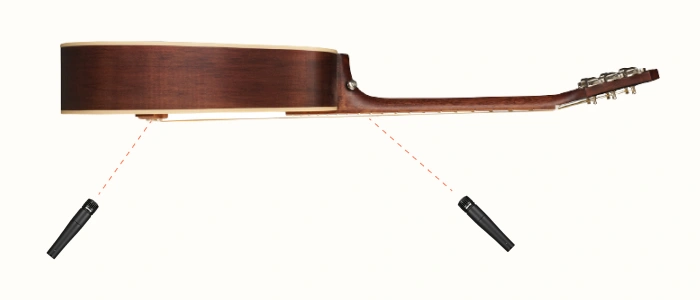
Mic Placement
The first thing you need to do is to place the microphone in the right position. Because you have two mics, you need them to pick up the full sound the guitar produces.
So, place one mic that aims at approximately the 5th fret and place the second mic that aims at the area next to the bridge. It’s better if mics pass the half of the guitar, so they are a little higher than the center of the guitar.
This way microphones will pick up most of the frequency spectrum. One mic will pick up lows and mids because it’s near the soundhole and body. The second microphone will mostly pick up highs and little mids.
After mic placement, it’s time to tweak the distance and angle. It’s very important for good sound.
Distance
Distance is important for two reasons. First, it should be far enough to pick up as much sound as possible. And secondly, your right-hand movement shouldn’t be interrupted by close mics.
Depending on the guitar, the distance could be slightly different for each case but like in the single mic recording, 7″ or 8″ will be pretty enough for two mic method. It’s an optimal distance for acoustic guitar recording.

After you place your mics and find the optimal distance, it’s time to tweak the angle. And it’s very easy.
Microphone Angle
The exact angle is not necessary for this recording technique. Because every case might be different. But what’s important is where to aim your mics. That’s the same for every guitar.
So, the first mic which is placed near the 5th fret should aim at the 12th fret, like in the first method. So, the angle could be somewhat different for each case. And the second microphone, which is placed at the end of the guitar body, should aim at the bridge. Depending on the size of your guitar, the angle could be different.
That’s all you have to do. One mic should aim at the 12th fret and the second one at the bridge of a guitar. And make sure that mics are a little higher so they look down the spots.
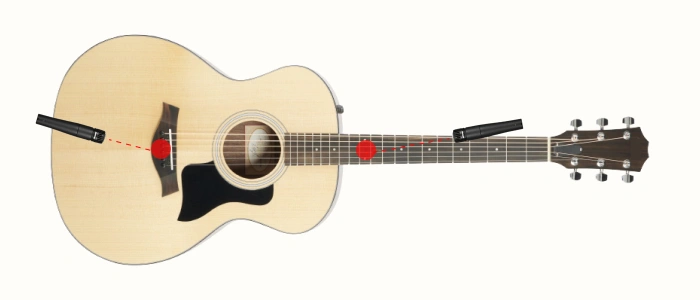
If you use a dynamic and a condenser mic, then it’s better to aim the condenser mic at the bridge and the dynamic at the 12th fret. Your acoustic guitar recording will sound much better this way.
Also, you can use only condenser microphones but for richer and fuller sound, it’s better to use different types of microphones.
Conclusion
Mic placement for acoustic guitar recording is crucial to producing good sound. Although guitar, room, and microphone quality are really important, if mics are placed incorrectly, it’s hard to get a great sound.
You can use both – single-mic or double-mic recording methods and see which one works for you. The single-mic method is easier and great for beginners. The double mic technique gives you a richer and more diverse sound.
There are many other methods to record acoustic guitars. The methods explained in this tutorial are popular and work well. After you comprehend these techniques you can try different ones or create your custom mic placement technique for acoustic guitar recording.
Excellent post. I was checking continuously this blog and I am impressed! Extremely helpful info specifically the last part. I care for such info a lot. I was looking for this certain info for a long time. Thank you and good luck.
Thanks a lot.