Changing electric guitar strings is an important part of regular maintenance for any guitar player.
It’s essential to keep your strings in good condition in order to achieve optimal sound quality.
Installing new strings on an electric guitar is very important for recording and you must always use new strings when you start recording the guitar.
So, in this guide, you will learn how to change electric guitar strings properly. However, this method can be applied to bass or acoustic guitar.
1. Prepare Tools
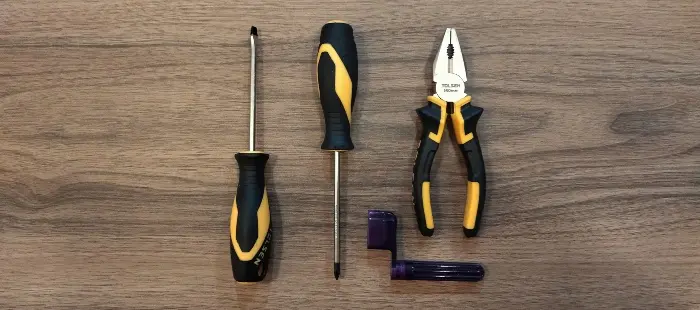
The first thing you need to do before changing the electric guitar string is to prepare all the tools that are required for this job.
There are some guitar-specific tools you will need and some general tools which will help you to easily change strings.
Here is the list of tools you will need when changing electric guitar strings:
- String Winders – Guitar string winders will help you to easily and faster tune your guitar.
- Screwdrivers – You will need screwdrivers to adjust intonation and also remove the truss rod cover.
- Wire Cutters – You need to remove old strings with wire cutters. You can use a standard wire cutter or a guitar string cutter.
- Hex Keys – A hex key, also known as an Allen key or truss rod wrench, is required to adjust the truss rod.
So, prepare these tools before you change electric guitar strings and if you don’t have any tools, you can buy guitar maintenance kits that include all the necessary tools for guitar maintenance.
2. Remove Old Strings
Changing electric guitar strings starts with removing old guitar strings which is a relatively simple process and should not take too long.
To begin, you’ll need to loosen the strings by turning the tuning keys. This will help remove the tension from the strings, making them easier to remove.
Then you just need to use a wire cutter to cut the strings. I always cut strings at the bottom, near the bridge because it’s easier for me to remove them this way.
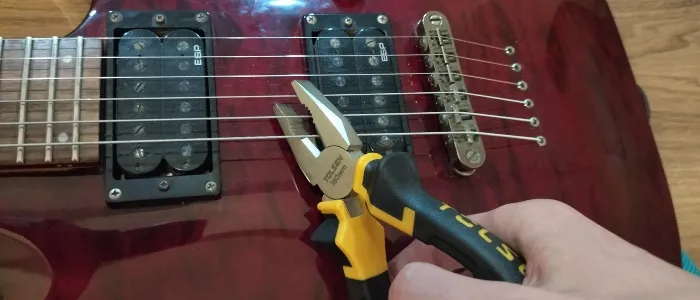
After that, carefully remove strings from the tuning keys and from the bridge, make them tidy, and throw them out.
Also, after you cut the strings at the bottom, you can cut them near the nut and it will make it easier to remove them from the tuning key but I don’t do that.
3. Clean Up Fretboard
The next thing to do after removing the old strings is to clean up the fretboard from the dirt.
There are different ways to clean the guitar fretboard and various cleaning kits work for rosewood and maple fretboards.
Clean Rosewood Fretboard
For my rosewood fretboards, I like to use Dunlop Ultimate Lemon Oil and a cloth or paper towel.
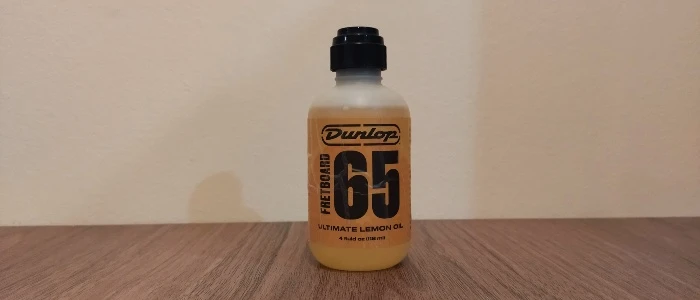
It’s a very simple process – just pour the lemon oil on the whole fretboard and live it for about 5 minutes. Then use a paper towel or a clean cloth to remove the oil and dirt.
It removes dirt from the fretboard perfectly and doesn’t damage the wood. If your fretboard is too dirty, then you may need to do it twice.
Some people use steel wool to remove dirt from fretboards and it’s a good method. And if you decide to use this method, then use super fine steel wool like 0000 steel wool.
Clean Maple Fretboard
For maple fretboards, I use different cleaning options because maple necks are different and they might be damaged.
You can use super fine steel wool for maple fretboards but I don’t use them. Instead, I clean my maple fretboards with Music Nomad F-One Conditioner.
It’s the best one in my opinion and can be sued for rosewood or ebony fretboards too.
Also, in this step clean different parts of the guitar such as the neck, body, bridge, and nut.
4. Install New Strings
After you clean up your guitar, it’s time to install new guitar strings, and I’m gonna show you the method I use.
There are many great electric guitar strings with different gauges, materials, and so on. I recommend brands such as Ernie Ball, D’Addario, and Elixir to name a few.
First of all, unpack the package, take the new strings, and thread all of them through the bridge of the guitar.
Now, thread the sixth string in the tuning peg about 3-4 inches and make sure that there is enough length of string left to wrap around the tuning machine.
Next, put the string in your palm, hold it with your index finger near the tuning machine, and start tuning it with a tuning peg.
Stop when the string is fully wrapped around the tuning machine and it has a decent tension. Do the same process for the rest of the strings.
After that, you have somewhat long strings leftovers coming out from tuning pegs and I cut them to make them smaller.
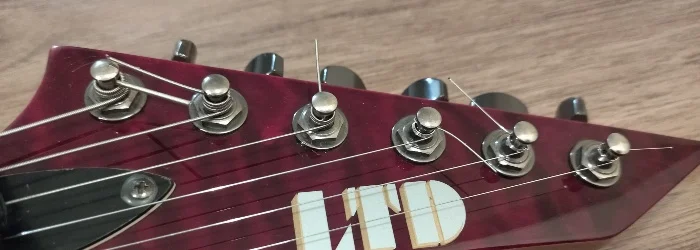
Some people don’t like to cut and instead, they wrap them but I like my strings to be tidy and neat.
Make Sure It Stays In Tune
After installing new strings, I tune them and start playing different riffs and leads because when you install new strings, they tend to go out of tune.
So, play riffs, and bends and it will strengthen new strings and after a couple of retunes, it will stay in tune.
You can tune your guitar by ear if you can but for more accuracy, I recommend using a tuner.
5. Adjust Truss Rod
When you change electric guitar strings, adjusting the truss rod is a critical part of properly setting up a guitar.
When you install new strings on electric guitar, especially if it’s a different string gauge, the string tension changes so the fretboard needs to be adjusted.
The fretboard should not be straight and it definitely shouldn’t have a so-called “hump” because it will cause string buzz.
Instead, your guitar fretboard should have a small “bow” and it will eliminate fret buzz and other issues.

For that, you will need to adjust the truss rod which is a steel rod that runs along the length of the guitar neck.
On some guitars, the truss rod can be adjusted from the headstock but on other guitars, it might be at the end of the neck, near the neck pickup.
To adjust the truss rod, you will need a hex key which will loosen or tighten the truss rod.
Turn the hex key clockwise to tighten the neck and a counterclockwise turn will loosen the neck and create a “bow”.
Do very small turns because if you overdo it, you might damage the guitar neck.
And to check if the neck bow is correct, fret the 1st and 15th frets and there must be a little gap between the string and the fret around the 7th fret.

Do this for all the strings and if everything is OK, then you can go to the next step which is setting up the string action.
6. Set Up String Action
The string action is the distance between the string and the fret. If the strings are too low, you will have a sting buzz but too high action will make playing very hard.
Depending on the bridge type, you might need a screwdriver or Allen wrench. Also, if you want to measure the gap between the string and the fret, you will need a ruler.
You adjust the string action from the bridge. There are different types of electric guitar bridges but each type has the option to change string height.
First of all, just play some riffs and leads and see how it feels. This way you will know if the action is too high or too low.
String action depends on your playing style and it might be different for every guitar player but there are some general recommendations.
When measuring string action on the 12th fret, the recommended is that the gap should be 4/64″ for the 6th string and 1/16″ for the 1st string.
But I never measure in such detail. I just know what I like and I adjust my guitar string action based on feel.
7. Adjust Intonation
And the final step in changing electric guitar strings is to set up intonation and it’s often skipped step, especially for beginner guitarists.
Intonation is critical for guitars because, without it, the chords and notes won’t sound correct no matter how you tune your guitar.
To know if a guitar has an intonation issue, just tune your guitar in the desired tuning, for example, standard E. You must use a guitar tuner for accuracy.
Now pick a string, for example, the 6th string, and play open and then play fretted on the 12th fret.
If you see that the fretted note is slightly out of tune (sharp or flat) it means that the intonation is incorrect and needs to be adjusted.
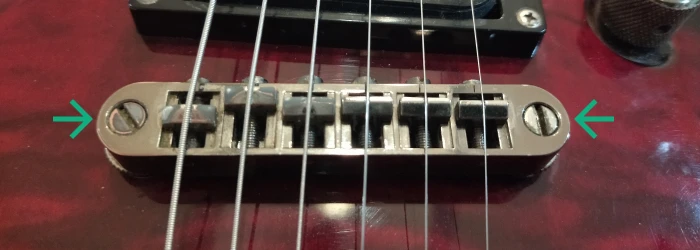
Depending on the guitar bridge, it might be different but your bridge should have screws or something similar that moves the bridge saddle forward and backward.
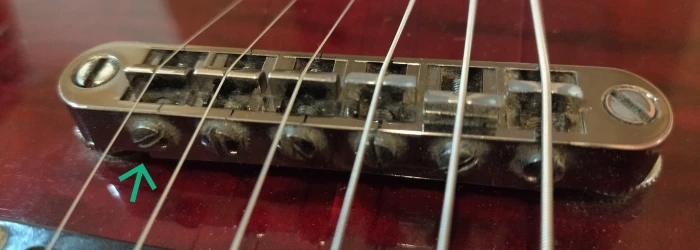
If the fretted note is flat, move the saddle forward (towards the neck), and move the saddle backward if the note is sharp.
Do this for all the strings and retune the guitar every time you make changes. Always use high-quality tuners and do very small screw turns.
FAQ: Changing Guitar Strings
If you have questions about changing electric guitar strings, here are the frequently asked questions and answers you are looking for.
How Often To Change Guitar Strings?
If you play regularly, change strings every 2 months or after 100-hour playing. Otherwise, you can change them in 3-4 months. However, always use new strings for recording.
Do You Need To Set Up Guitar After Changing Strings?
Yes, you should always set up the guitar after installing new strings. This includes truss rod adjustment, string action, and adjusting intonation.
Can I Use Electric Guitar Strings On Acoustic?
In general, you can use electric guitar strings on acoustic guitars and it will sound good. But it’s recommended to use acoustic strings for acoustic guitars because they are made specifically for that purpose.
Conclusion
As you can see to change electric guitars you need to complete several steps which include removing and installing new strings, cleaning the fretboard, and adjusting various settings. This way your guitar will sound good and it will need less maintenance. Always follow these steps and you can apply this method on bass and acoustic guitars.
I am extremely impressed with your writing abilities and also with the layout of your weblog. Is this a paid topic or did you customize it yourself? Anyway keep up the excellent quality writing, it is rare to look at a great
blog like this one nowadays.
Thanks, Cathryn.
Yeah, this is written and designed by myself.